Վերադարձ դեպի Կաղապարներ
Կրիայի Քարի Նկարչություն
Պահանջվող նյութեր
- Կլորավուն, գմբեթաձև քար
- Կանաչ ակրիլային ներկ
- Մուգ կարմիր ակրիլային ներկ
- Սև ակրիլային ներկ
- Սպիտակ ակրիլային ներկ
- Հարթ վրձին (միջին)
- Բարակ մանրամասների վրձին
- Թափանցիկ լաք սփրեյ
Քայլ առ քայլ հրահանգներ
1
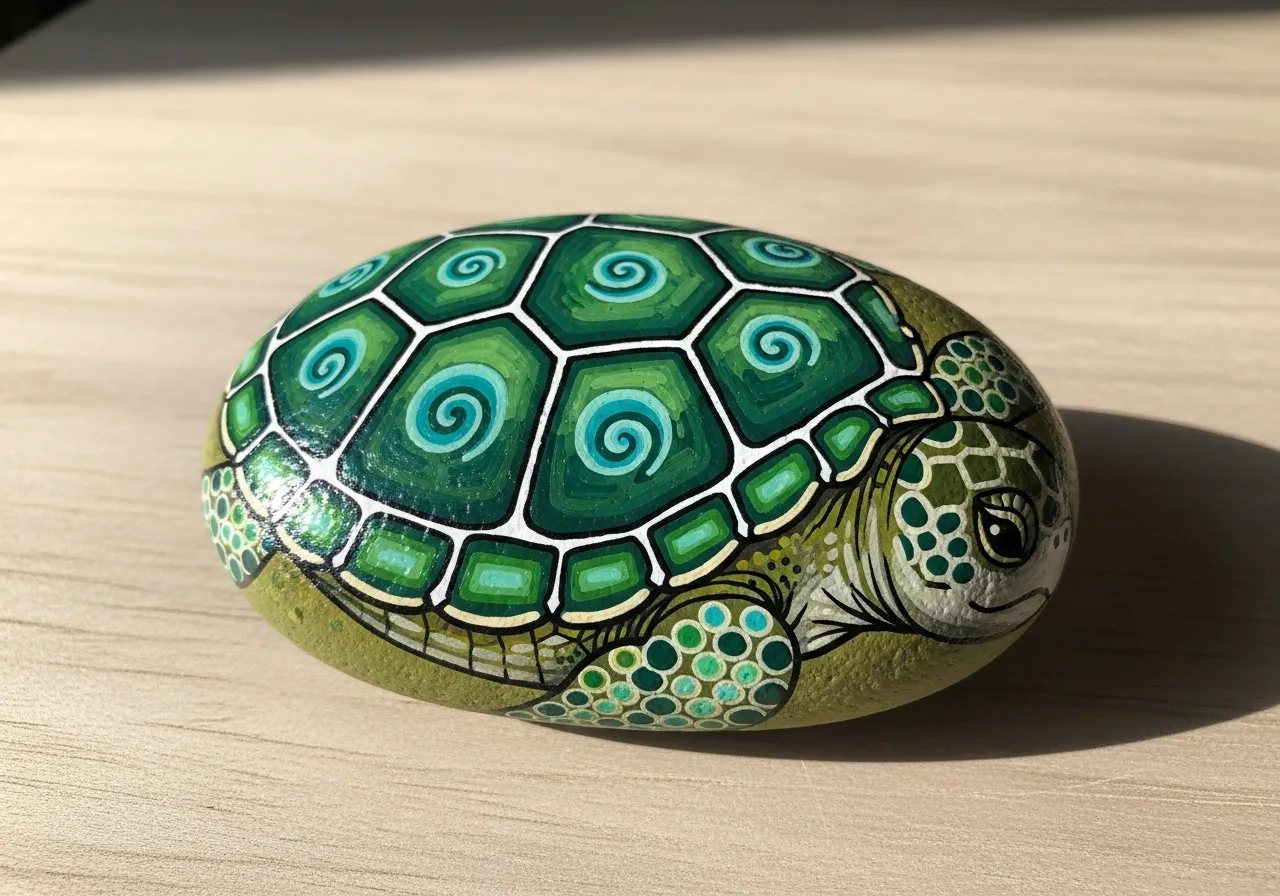
Քայլ 1: Prepare and base coat
Wash and dry your dome-shaped rock. Paint the entire rock with light green paint as a base coat. Let it dry completely before moving to the next step.
2
Քայլ 2: Draw the shell pattern
Use a pencil to draw hexagonal shapes on the top of the rock to create the shell pattern. Start with a shape in the center and add more around it, like a honeycomb.
3
Քայլ 3: Paint the shell segments
Paint each hexagonal segment using alternating shades of green, yellow, and brown. Leave thin lines between segments unpainted or paint them dark green for definition.
4
Քայլ 4: Add head, legs, and tail
Paint a small green head peeking out from one end of the rock. Add four small green legs on the sides and a tiny tail at the back. Add two black dot eyes and a small smile on the head.
5
Քայլ 5: Add details and seal
Outline the shell segments with dark green or black paint for a polished look. Add white highlight dots on each segment. Let dry completely and spray with clear sealant.
Քայլ 6: Ավելացնել RoxGeo կոդը
Ձեր ժայռի ներքևի կամ հետևի մասում գրեք ROXGEO.COM, որին հաջորդում է կտրվածք և ձեր ժայռի եզակի կոդը (օրինակ՝ ROXGEO.COM/ABC123): Սա հնարավորություն է տալիս որոնողին ուղղակիորեն գնալ ձեր ժայռի պրոֆիլի էջ և գրանցել իր հայտնագործությունը: Եթե ժայռը չափազանց փոքր է ամբողջական հասցեի համար, գրեք #ROX, որին հաջորդում է ծածկագիրը՝ առանց բացատների (օրինակ՝ #ROXABC123), այն կարճ է, հեշտ է որոնել Google-ում և ուղիղ դեպի ձեր ժայռի ճամփորդության էջը: Օգտագործեք նուրբ ծայրով մշտական մարկեր կամ ակրիլային ներկի գրիչ և փակեք այն թափանցիկ լաքով, որպեսզի ծածկագիրը ընթեռնելի մնա անձրևի, արևի և արկածների ժամանակ:
Օգտակար խորհուրդներ
- Ընտրի՛ր այնպիսի քար, որի ձևը համապատասխանում է քո մոտիվին։
- Մատիտով նախ նշի՛ր ուրվագիծը, հետո սկսի՛ր ներկել։
- Թող յուրաքանչյուր շերտը ամբողջովին չորանա, նախքան հաջորդը քսելը։
- Ծածկի՛ր թափանցիկ սփրեյով, որպեսզի քարը պաշտպանված և գեղեցիկ մնա։
- Ներքևում գտնվող RoxGeo կոդի համար օգտագործեք անջրանցիկ մշտական մարկեր (ինչպես Sharpie) կամ ակրիլային ներկի գրիչ: Կոդերի վրա քսեք 2-3 շերտ թափանցիկ հերմետիկ նյութ, որն այն ընթեռնելի է պահում անձրևի, արևի և բեռնաթափման ժամանակ ամիսներ շարունակ:
- Ձեր քարի վրա #ROXCODE (օրինակ՝ #ROXABC123) գրելը հեշտացնում է այն գտնելը Google-ի որոնման միջոցով: Մենք ակտիվորեն օպտիմիզացնում ենք այս հեշթեգը, այնպես որ յուրաքանչյուրը, ով որոնում է այն, արագ կգտնի ձեր ռոքի պրոֆիլի էջը:
- Ամբողջական ROXGEO.COM/CODE հասցեն որոնողին տանում է անմիջապես ձեր ժայռի քարտը, որտեղ նրանք կարող են տեսնել նրա ճանապարհորդության ամբողջական պատմությունը, նախորդ որոնողներին և լուսանկարները ճանապարհորդության յուրաքանչյուր կանգառից:
Ներկիր այս ժայռը և հետևիր նրա ճանապարհորդությանը RoxGeo-ի հետ:
Ներբեռնեք RoxGeo անվճար